There is one quality you need to qualify when it comes to custom development, and it is to unlock the bootloader of the device. Once this is done, you have opened floodgates to a plethora of customizations. We suggest that you get hold of TWRP recovery before you make your steps in the flashing community. This is not a compulsory requirement but only a recommendation. This guide explains the steps required to Uninstall TWRP on Android without getting stuck in a boot loop and bricking your smartphone.
As the official recovery takes time to be built, the enthusiasts are ready to try unofficial versions during the wait time. However, what if you do not need this and wish to go back to stock recovery? Well, for this you have landed at the right place.
About Uninstalling and Removing TWRP App

There are many reasons why you want to bid adieu to TWRP despite the goodies that it offers. Firstly, many users are still using unofficial builds of the recovery. As a result, they face a few issues.
These include:
- Unable to mount data.
- Data encryption.
- Internal storage showing OMB among others.
In some cases, these may also be present on official builds.
Another reason you need to uninstall this and restore it to stock recovery is that all functions of TWRP can still be carried out without using it. We are going to justify this in the following reasons:
- You can flash custom ROM without this.
- Likewise, you can also flash stock firmware directly through fastboot commands.
- You can also fix Magisk Bootloop without this.
- Uninstall Magisk modules using this.
- When it comes to flashing files, there is an ADB sideload option already and the list goes on.
This would have given you a slight idea of how it is possible to survive in custom development without this.
POPULAR ISSUE: TWRP Error 7 Ultimate Fix Guide (Easy to follow).
Uninstall TWRP and Restore To Stock Recovery (Samsung, Xiaomi, Huawei)
Step #1: Install Android SDK Platform
Install this as it shall provide you with the required binaries. Download it from here.
Step #2: Enable USB Debugging mode
This is required so that the system can interact with the device in ADB mode. Now, why do you need this? It is used to boot the device to fastboot mode.
Go to Settings > About Phone > Tap on Build Number 7 times > Go back to Settings > System > Advanced > Developer Options > Enable USB Debugging. All done folks.
Once done, move to the next step.
Step #3: Download the Stock Recovery
This is very important; you need to get a hold on stock recovery for the device, for this you need to get the stock firmware of the device and after this extract the same. About every major OEM uploads firmware on their official website; therefore go to their site and get the appropriate file for your device.
Caution: Download the firmware version installed on the device, and check the current OS version by going to Settings > About Phone. After this download firmware has the exact version of this. If you flash an older or even new stock recovery onto the device then this shall result in Bootloop or a bricked device. With this being said, extract this file and get stock recovery.img file.
If you carry a OnePlus device then this file is placed in payload.bin. Realme carries its files inside a ZIP package. Once you get the file follow through.
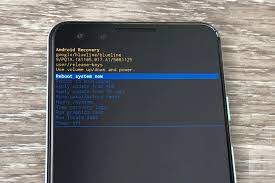
Step #4: Now Boot the Device in Fastboot Mode (Important)

- It is now time to connect the device to fastboot or bootloader mode.
- Connect the device to the system through a USB cable; make sure USB debugging is enabled.
- After this go to the platform-tools folder, type in the CMD address bar and press “enter”. This shall launch in the command prompt.
- Type in the following command:
Adb reboot bootloader
Your device is now booted in the fastboot; you may proceed ahead with your Android device.
ALSO CHECK: Top Fastboot ADB Recovery Commands PDF Cheat Sheet.
Step #5: Finally, Uninstall the TWRP Recovery

First of all transfer stock recovery to the platform-tools folder. In the same way, make sure that the complete name of the file is recovery.time. If this is not the case then properly rename it.
Note: .img is the format of the file and you do not need to change it. Ensure the filename is recovery, and it shall automatically become recovery.img.
- Type following command in cmd windows to flash stock recovery
fastboot flash recovery recovery.img
- Once it has been flashed, you may reboot the device to the OS through the following command:
Fastboot reboot
Your device has stock recovery installed.
Android TWRP Recovery FAQs

What is Android Stock Recovery and Is It any good?
All Android devices come with Google’s recovery environment, often called “stock recovery”, by clicking on device-specific buttons that boot to the recovery system as phone or tablet boots or by issuing ADB command that boots the device to recovery mode. Like, reset the device to its factory default state from here. Use recovery mode to flash OTA update files. If you wish to flash a new ROM to the device or re-flash the factory default ROM file then you need to first boot to recovery mode.
This recovery is a minimally limited system. It is designed to be ignored and can only flash OTA updates and ROMs provided by the manufacturer of the device, not third-party ROMs.
RECOMMENDED: Top Android Shooter and Race Games APK [Under 20MB].
Basics of Android Custom Recovery you need to know
This is a third-party recovery environment. Flashing this onto the device replaces the default recovery with a third-party customized environment. This is somewhat the same as flashing custom ROM like CyanogenMod but despite replacing the device’s Android OS, it replaces the recovery environment.
This does the same as stock android recovery yet it has some additional features. It can create and restore device backups. It allows the installation of custom ROMs. ClockworkMod also offers a ROM Manager Application, which allows access to many of these features from running an Android system. This app requires custom recovery installed to function.
Is a Custom Recovery good for you?
Such environments are useful when installing custom ROMs on the device, as they provide backup, restore as well as ROM-flashing features as you shall need them. You shall also need to unlock the device’s bootloader to install custom recovery on it.
Android offers a new way to create full device backups, though this feature is hidden and requires using an ADB command. This does not require unlocking the bootloader, installing custom ROM, or rooting the device to create or restore a full backup.
Install this when you are messing around with custom ROMs if you want to have powerful backup features. This is deemed to be a necessary pre-requisite to install custom ROM but is not always required. Like installing CyanogenMod with CyanogenMod installation shall also install ClockworkMod Recovery (CWM). Following are the guides for this and continue using the stock android system if you want backup features.
In general, these are only necessary if you plan to flash a custom ROM. Most Android users would not even notice the difference between a device with a stock recovery system install and one with a custom recovery.
ALSO CHECK: Fix your Android device If It’s stuck in a boot loop.
Will Flashing Stock ROM remove TWRP?
Yes, it will remove TWRP. However, it will only remove if the ROM is not modded or custom. This means that you will have to install it again.
I’m stuck in Recovery mode, how to get out?
Revert all the changes you have made and flash the custom ROM again using tools such as Odin.
Which devices can it be removed from?
It can be removed from any device you install it on. Here is a list of popular devices that people are using TWRP on:
- Samsung
- Xiaomi
- Huawei
- OnePlus
- ZTE
Concluding
TWRP can be very tricky to get used to or for a newbie to master. This causes various users to brick their devices and go into an endless boot loop. Our article walks you through the full process of TWRP Uninstall and restore to stock recovery. Do let us know if you have any feedback for the above steps or if you have any alternative solution for removing it from the device.

")

")


 Free Download For Windows 10/11")
")
")
")