The main difference between Windows 10 pro edition and Home edition is networking management capabilities and Policy features. This guide will detail how to enable group policy editor in Windows 10 or Windows 11 Home
If this is missing from your Windows version or you are getting an error on gpedit.msc not found then you need to check which edition you are using.
This is quite a serious drawback as we need them even to manage the settings of the local system. This is better than changing settings via the Windows registry, which is risky. Most of these can revert easily while registry editing can adversely affect the system.
Follow through to know how to install this. The same method can be used in Windows 7 and 8 as well.
Note: As PowerShell script is the fast yet safe method to install this we have promoted this to the number 1 spot.
How To Enable Group Policy Editor (gpedit.msc) in Windows 10/11 Home (4 Ways)
Manually Install GPEdit.msc via PowerShell
For this:
- In the first step, you need to download its script. This simple script shall install the disabled policy feature.
- Then right-click on the downloaded gpedit-enabler.bat file, and choose run as administrator.
- This shall begin the installation process. It might take some time depending on the system performance. After completing the process, hit “any key” to close the command prompt window.
- Though restart is not required; if policies are not working then you are required to restart your system once.
READ: How to Configure Stylus Settings in Windows 10/11.
Use GPEdit Installer
This is a configuration manager for Windows which makes it quite easy to configure Windows settings. Now, despite going through the Windows registry, you can configure various aspects of Windows OS via group policy editor. By default, this is not included in Windows 10 or Windows 11. You first need to download the editor.
This is a simple setup file that when you run installs and configures this.
Download GPEdit Installer for Windows 10 Home
READ: See how easy it is to disable InPrivate Browsing in Edge Chromium.
Use Windows Settings
If you carry 32-bit Windows (x86) then the setup is installed quite smoothly without any issues and you shall be able to access this via the Microsoft management console by going to “Run” and then “gpedit.msc”. If you have 64-bit Windows (x64), you need some extra steps after running the installer. You need to follow the steps below:
- In the first step, go to “C:\\Windows\SysWOW64 folder”.
- Then you must copy the following folders and files from C:\\Windows\SysWOW to C:\Windows\System32 “GroupPolicy”, “GroupPolicyUsers” and gpedit.msc.
This makes sure that the user runs the editor from the Run dialog.
Download Group Policy Editor (PolicyPlus)
This is a third-party application and an alternative to it. It carries a similar interface. The major benefit of using this is that it has a search function where users can search for required policies.
For this:
- In the first step, you need to download this from the following link:
Download PolicyPlus for Windows 10 Home
- Once done, run Policy-Plus.exe. This shall open immediately as it is a portable application. The best thing is that you can change it as you want in the Windows built-in editor.
These methods shall help you enable this in your system.
READ: Everything you need to know about Sticky Notes in Windows 10/11 (Ultimate Guide).
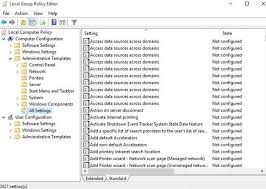
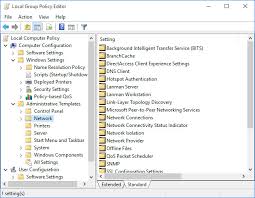
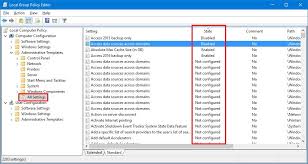
How to Open Group Policy Editor After Enabling It
Once installed, you need to access them and edit the ones implemented on your system.
- It would be best if you opened the Run dialog box by hitting “Windows Key + R”.
- Then type in “gpedit.msc”.
- Hit “enter”.
This is going to open its window.
Few people complain that though this method has worked for them, most settings do not work in this edition. In your case, if both methods fail, then you need to try another method.
Note: You need to keep one thing in mind: these methods are useful when you want to use the policy editor. This method shall not be effective if you are a domain administrator and wish to configure this on the Windows home system using the Windows server active directory as it does not support joining a domain in the active directory.
Fixing Local Group Policy Editor Missing
There are several steps you can take to locate the local file:
- Put your PC into safe mode.
- Run the above .bat files with “Administrator” privileges.
- Reboot, and it should be there now.
READ: Here is how to calibrate your Gaming Monitor for better colors.
FAQ: Problems with gpedit.msc
If you are getting the following error message while starting this
“MMC cannot create a snap-in”
Then it would be best if you started following the steps below:
- In the first step, you need to go to C:\\Windows\Temp\gpedit\folder and be sure it exists.
- Then you need to download the following zip file and unzip it to “C:\Windows\Temp\gpedit”. This should replace both the files x86.bat and x64.bat.
- Run x86.bat file if you are running a 32-bit OS and x64.bat if running 64-bit Windows 10. Be sure to run batch files as an administrator.
Once you have followed the steps mentioned above you should have a working group policy editor.
That is about it!
Closing Statement
I hope this article helps you enable the group policy editor in Windows 10/11 Home and also helps you fix the local group editor error. I have shared the most reliable methods which include configuration tweaking.


 Free Download For Windows 10/11")
")

")


 Free Download For Windows 10/11")
")
")
")