
With Android’s open-source nature, you can try many new things like unlocking the bootloader on the device which in itself opens the gate to many other fixes. It includes the ability to install custom recovery like TWRP, flashing modules and frameworks and getting administrative privileges in the form of the root. This tutorial shows you how to fix TWRP Error 7/1 without needing a PC that you may experience while flashing a custom ROM such as LineageOS.
Now, to carry out customizations you need to have a custom recovery like TWRP. This is not free of errors and bugs. Earlier when it had a competition with CWM it had some bugs. For now, it has become a beast and the only custom recovery in the market. Other modified recoveries you see across the net are based on this but there are a few issues that users are facing. If you are facing such an issue then follow through.
Fixing TWRP Error 7 – What you need to know
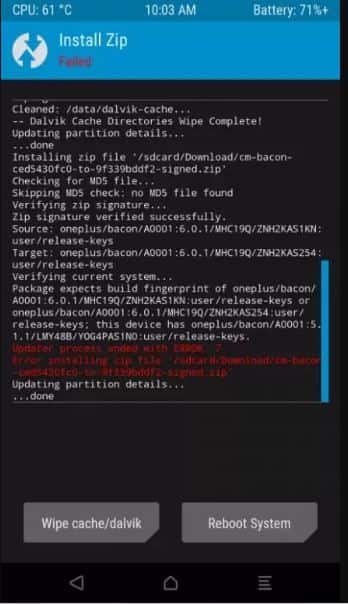
While flashing a custom ROM you may have faced an error on the device, it is caused when the ROM’s updater script file checks to see if the mobile device is compatible with it we are installing known as “asserts”. This is a safety mechanism that keeps a check that we do not install any incompatible version because if we do we might end up with a bricked device.
Though this mechanism is an important component, many users face this error as they flash the correct build. If you are getting a custom OS on the device then you shall not be facing this issue in the first place, still, if you are then do not worry.
Pre-requisites that you need to have:
#1: Any unzip software like 7Zip, WinZip and others.
#2: Text editor software like notepad++: We suggest you not use Windows’ default notepad application.
How To Fix TWRP Error 7/1 (4 Working Ways)
Extract your ROM
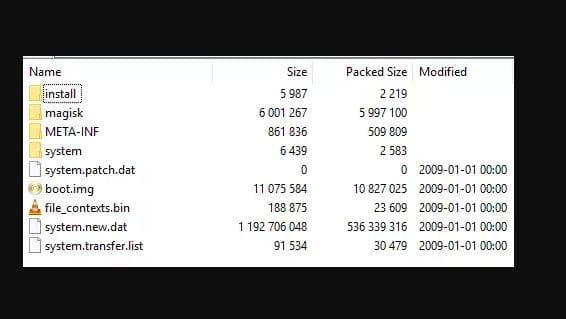
Extract the custom ROM that gives this error to the system.
Rename the ROM file
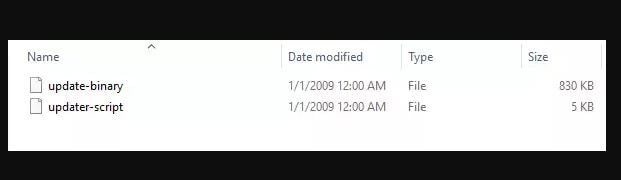
- Go to META-INF folder > com >> google >> android.
- In here you would find 2 files; update binary and updater-script. Rename later to updater-script.txt.
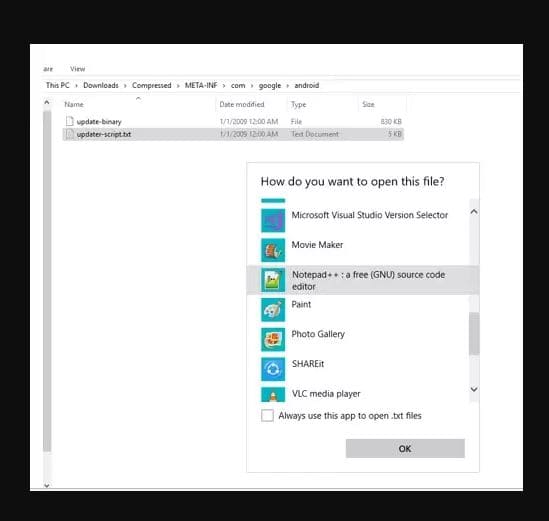
Open the .txt file
Next right-click on “updater-script.txt file and choose “open with”. From the menu choose “notepad++ application”.
Edit the “updater-script”
You need to delete lines starting from the word “assert” to the next semi-colon. This portion is usually on the top.
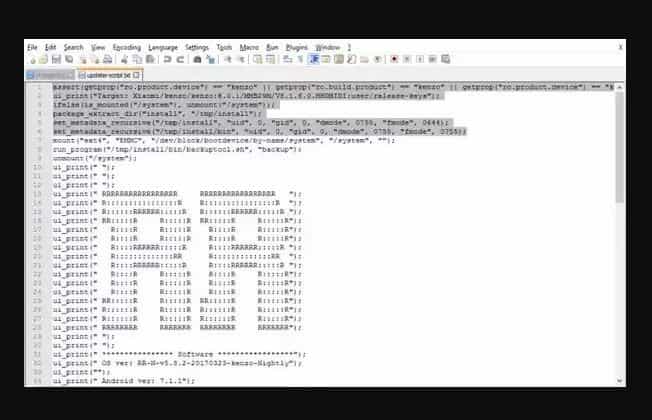
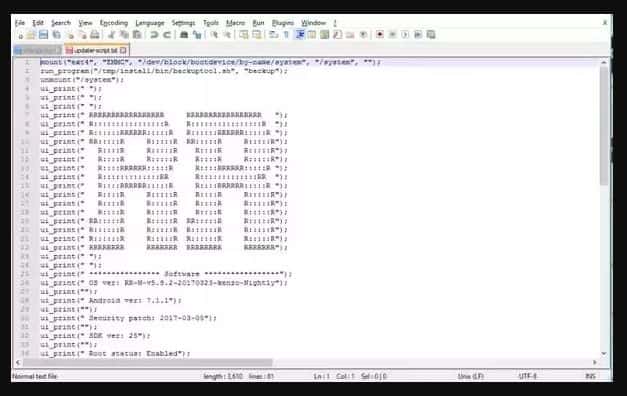
Once removed highlighted text, the first line should now begin from the “mount” word.
Save and rename
Once the mentioned section has been deleted from the file, save it, once done rename “updater-script.txt” back to “updater-script”.
ALSO CHECK: Nexus 5X Won’t Boot Past Google Logo [Fix].
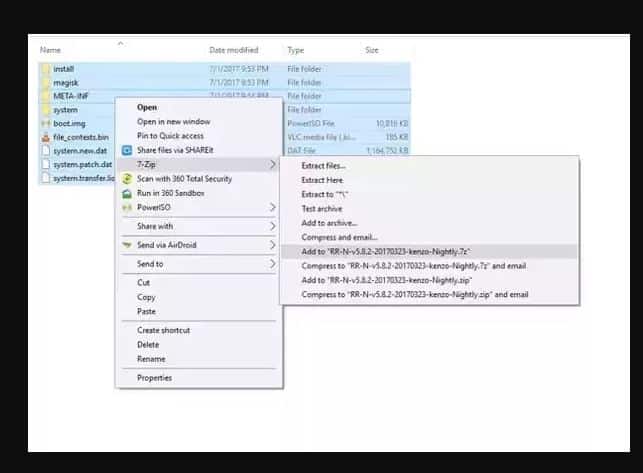
Recompress
Re-compress files as shown below:
Flashing the ROM
Once ROM has been re-compressed, transfer it to your device and try flashing again. Now you would not face TWRP error.
To flash TWRP there are many things you need to enable on the phone
Unlocking the hidden developer option
For this go to settings > about phone > more, and choose “build number” 7 times. These shall now appear on the settings screen.
Make sure USB Debugging is enabled
For this go to settings > developer options, check the “enable unlocking” box.
Install ADB and fastboot on system
Next, get these as with this you can control your phone through a command prompt or terminal and sideload software onto it.
The best way is to get SDK platform-tools from the Android developer’s site. Download tools, and extract them to a folder (we go with “C:\adb”)
Connect the phone to the system through a USB cable. Be sure that its mode is set to “transfer files” or “transfer media”.
ALSO CHECK: ADB Fastboot Commands (Latest List) PDF.
Reboot bootloader
Go to the TWRP devices web page on your phone, type its model into the box, on the next page do to download links, pick mirror and get the latest TWRP image file to the system.
Next open the command prompt as administrator, use “cd” command to change the default directory to where platform-tools were extracted (for us command is cd\adb\)
Next enter:
Adb reboot bootloader
This shall reboot the connected phone to it.
In here, it is crucial that at the top of the screen, it says “unlocked”. This indicates that it is unlocked and you can continue with flashing TWRP.
If it is locked, you shall need to follow the phone’s OEM’s instructions to unlock it. HTC, Sony, and Motorola have tools on their sites that guide the process throughout.
TWRP Recovery Installation FAQ
Method #1: Installing TWRP Recovery
Assuming the bootloader is unlocked, once the phone is in recovery mode use the volume button to scroll to download mode, hit the power button to select it.
Once in this mode, enter the following command on the system:
Fastboot flash recovery twrp-version.img
Replace “twrp-version” with the same file name of .img that you downloaded.
Press enter to install it into your phone.
To open this, click “reboot to recovery in a bootloader”. To access it and the bootloader in future, turn off the phone and hold the volume down and power buttons till the bootloader loads.
ALSO CHECK: Android WebView Crashing Fix [Easy Tutorial].
Method #2: Installing SuperSU with TWRP
When it opens, it shall ask if you want to “keep system read-only”. Answer in “no” as this would prevent installing custom ROM and making use of its features.
Tick box which says “never show you this screen again”, swipe across the bottom of the screen.
On the system download its latest version and save it to the device.
Back to TWRP’s main menu, click install, and go to SuperSU zip file download, click in and then swipe to confirm flash.
The rooting process shall now begin; it shall take about a minute. Once completed, click “wipe cache/Dalvik” then reboot the system.
Final Statement: TWRP Error 7/1 should now be fixed!
We all love Android for one reason and that is customization! However, there can be many issues that can arise while you are flashing custom ROMs such as lineageOS. Our article has shared the methods on TWRP Error 7/1 fix without requiring a PC.

")

")


 Free Download For Windows 10/11")
")
")
")